© 2012 by Nick B. Nicholaou, all rights reserved
President, Ministry Business Services, Inc.
Reprinted from Christian Computing Magazine
Combining the power of Outlook and Mail Merge can help you communicate better! Windows and Mac Outlook versions are different, so let’s look at how to do mail merges in both!
What is Mail-Merge?
Okay, the basics first. Mail merge is the tool that allows you to create one document, like a letter or an email, and send it to many people with their personalized information inserted throughout so that it feels as though it was written just to them. We normally think of doing that in a letter in Word. But it can be done in Outlook, sending personalized emails to many people all at once!
Mail Merge Data Source
You can have more than one kind of data source– where the recipients’ name, email address, etc are located. The two easiest to work with are:
- Outlook Contacts. If all the information you want to use in your mail merged email is in your contacts, that’s the quickest and easiest data source.
- Excel Spreadsheet. You can also build a spreadsheet if you need to include more information than what is available in your Outlook Contacts. This is a great option if you want to export the recipients’ data from a database, too, since many databases will export in a spreadsheet format.
If you will be using an Excel spreadsheet, I recommend using a header row (the first row in the spreadsheet) to label the data that will be in each column. Here’s an example:

Those column labels will come in handy when creating your mail merge file. Making the first column the email address can make the process easier, but isn’t actually necessary.
Whether you use Windows or a Mac, the process of mail merging emails actually happens in Word, so that’s where we’ll start.
In Word 2013 for Windows

In Windows, click on the Mailings tab (this process is the same in Office 2007, 2010, and 2013), then click on Start Mail Merge and choose Email Messages. Then click on Select Recipients, where you’ll have the opportunity to type a new list, use an existing list (this option opens a dialogue box in which you can navigate to an existing file), or select from Outlook contacts (the first time you choose this option it may ask you to select a profile; most likely only one exists).
The next step is to click Greeting Line on the Mailings tab. Here you’ll format how you’d like the greeting to appear in the email. Here’s a tip: you can overwrite the options, changing Dear to Howdy and following it with an exclamation mark rather than a comma even though those options don’t appear in the pull-down list by simply clicking on that field and typing what you’d like. Use words and formatting that reflect how you normally communicate.
Now you can type your email and insert data from your file or Outlook contacts. For instance, you might type, “Thank you, ” and then want to insert the recipients’ first names. When you get to the point where you’d like the first names to be inserted, click Insert Merge Field on the Mailings tab and select that field. Using the Excel spreadsheet above, and continuing the sentence after inserting the merge field, my sentence looks like this:
Thank you, «First_Name», for joining us Sunday morning here at First Church.
“«First_Name»” is the wild card field name that will pull each recipient’s name and insert it there when the process is completed.
You can continue writing the email, being as personal as you’d like by inserting the merge fields you need to accomplish your communication goal– even re-using fields to help make it a warm letter! For instance, towards the end of the email you may want to say something like:
«First_Name», please feel free to email or call me with any question you may have.
Once you’ve written your email form letter, I recommend testing it to make certain it says what you want, and says it well, before sending. This is an important step that can make the difference between a warm and personal email vs an obvious form letter. To do so, simply click the Preview Results option on the Mailing tab. There are arrows next to that option that will scroll you through the recipient data so you can see/ read how the final email will be constructed. You can unclick that option and continue editing your email form letter and then preview it again as often as necessary to get it just right.
When you’re pleased with what the results will be, click the Finish & Merge option on the Mailings tab, and then select the Send E-mail Messages option. That will send the emails– each individually addressed and constructed to just one person.
In Word 2011 for Mac

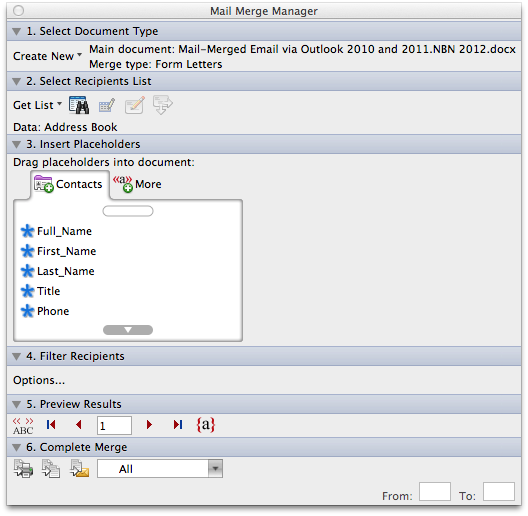
On a Mac click the Outlook Tools menu option, and then click on Mail Merge Manager, and click on Create New. The option to begin creating your email mail merge is Form Letters.
Then click on Get List and choose Open Data Source to open an Excel spreadsheet, for example, or Office Address Book to use your Outlook contacts.
If you’re using your Outlook contacts you’ll use the Filter Recipients Options to choose which contacts to include. In that window you can choose among Categories or Complete Records– Complete Records lets you select specific individuals.
The rest of the process is exactly like what I described in the Windows section, beginning with the third paragraph of that section.
Using this powerful tool will help you communicate better when emailing to groups of people. It eliminates the need for putting a lot of email addresses in the To, CC, or BCC fields and has the potential of making each email warm and personal.
